Blog

GitHub Integration with MongoDB Stitch

Greetings, fellow travelers!

I wanted to take some time today to talk about MongoDB Stitch, a new back-end-as-a-service offering by MongoDB, and walk through making a simple web page to view GitHub Issues.

If you are unfamiliar with MongoDB or other Document Store databases, I highly recommend you take some time to read more about the differences between the different database types,  go through MongoDB’s Getting Started guide, or even take one of the awesome courses offered via MongoDB University.

Fortunately for us, since MongoDB Stitch is a back-end-as-a-service, we don’t need to be experts in setting up and administrating a MongoDB database; they’ll do it for us!

Note: MongoDB Stitch is still in beta. Some of these features I describe may change before their 1.0 release.

We’ll need a few things:

  1. A MongoDB Stitch Account
  2. A MongoDB Atlas Account (creating a Stitch Account will create an Atlas Account)
  3. The MongoDB cli (optional)
  4. A GitHub Account
  5. A GitHub Repository you manage and can create webhooks on
  6. Your Favorite Text Editor

The Goal

We’re going to create a web page that displays a list of created issues in a set of GitHub repositories. When an issue is created in GitHub, it will fire a webhook to our Stitch application, which will massage the data some before storing it in the Atlas database. Finally, the web page will access the Stitch Atlas service to list the issues.

Let’s get started.

Create a Stitch and Atlas Account

Getting started with Stitch is simple. Head over to their landing page and click on the “Get Started Free” option. This will walk you through creating a Stitch and an accompanying Atlas Account and Cluster. If you have any questions on this stage I highly recommend you look through their documentation on getting started with Atlas, and creating a cluster. Their explanation is concise and easy to follow.

Create Your Stitch Application

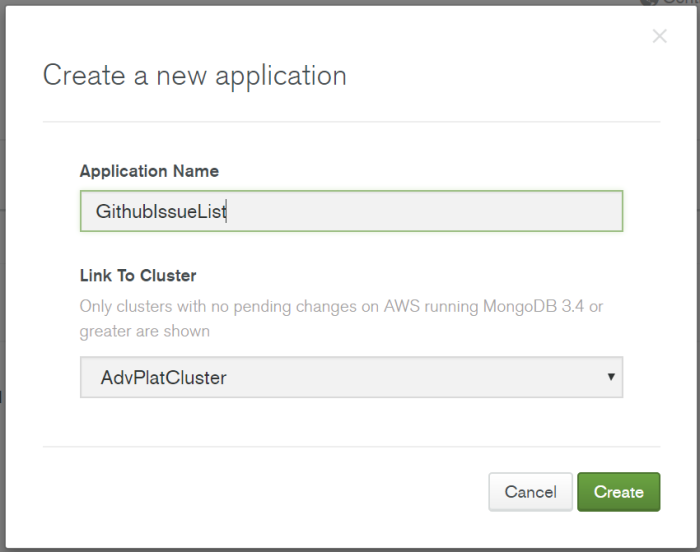
Getting started with a new Stitch Application is as simple as logging into the portal, clicking “Create New Application,” and giving it a name and cluster! For this, I will be creating a Stitch Application called GithubIssueList and assigning it to my AdvPlatCluster Atlas cluster.

Note: if you just created this cluster, you may have to wait a few minutes for it to show up in the list, as the cluster may still be constructing itself.

1_newStitchApp

Authentication and an API Key

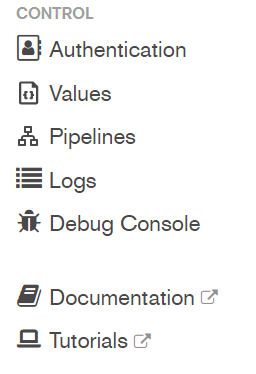
Once complete, you’ll be taken to your App’s Getting Started page. The first thing we will need to do is turn on Authentication. Anonymous Authentication is a great way to get started, but not a great way to build a secure application. Let’s go to the sidebar under “Control” and navigate to the “Authentication” page.

2_controlAuthentication

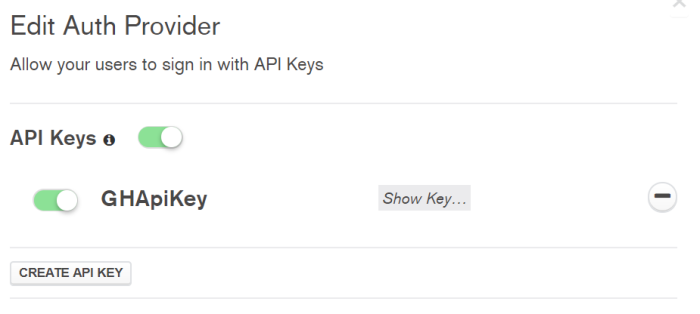
We’ll enable API Keys for authentication and make a new API Key: GHApiKey.

4_noteUserID

Take note of the API Key and the User’s ID field. We’ll be using them both later.

Set up the Database

Now we’ll need a place in our cluster to store the data. Let’s navigate to the Atlas Cluster’s section in the sidebar, click on the cluster we linked earlier, and then on the “Rules” tab. You’ll see there is already a collection created for you of format ​app-{someNumbers}.items. We’ll create a new one for the database ​ghdata and the collection issues6_newCOllection

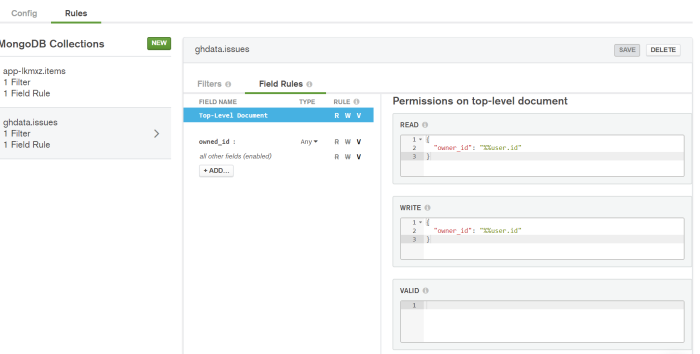
When we receive our webhook data from GitHub, this is the database and collection we’ll put the documents into.

You’ll notice that we have some preconfigured permissions. By default, both read and write permissions are allowed if the document’s owner_id field is equivalent to %%user.id. We should know that %%user is a special expansion that can be used in Stitch Rules and Pipelines. For our purposes, when querying the database via Stitch while authenticated with our API Key, we will only be able to read or write documents whose owner_id field is equal to the User ID field we wrote down earlier.

You’ll notice there is also a Filter tab. This, too, comes preconfigured:

7_filters

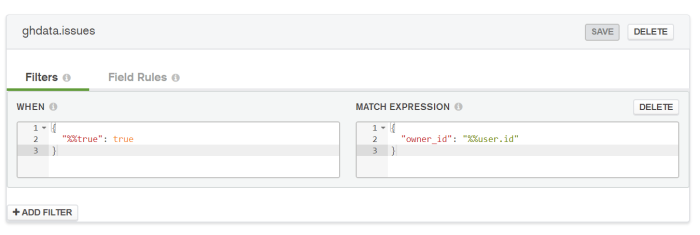
The default filter says “When true, only show documents whose owner_id field is equal to the current User’s ID field”.

We should note that filters are applied before rules are.  This means that even if we remove the preconfigured Read and Write rules around owner_id, we would still be unable to read another User’s documents as the Filter would exclude them before the Rules could be evaluated.

At this point you might want to connect to your Atlas cluster to ensure you have solid connectivity and your IP address is whitelisted.

Set up GitHub Integration

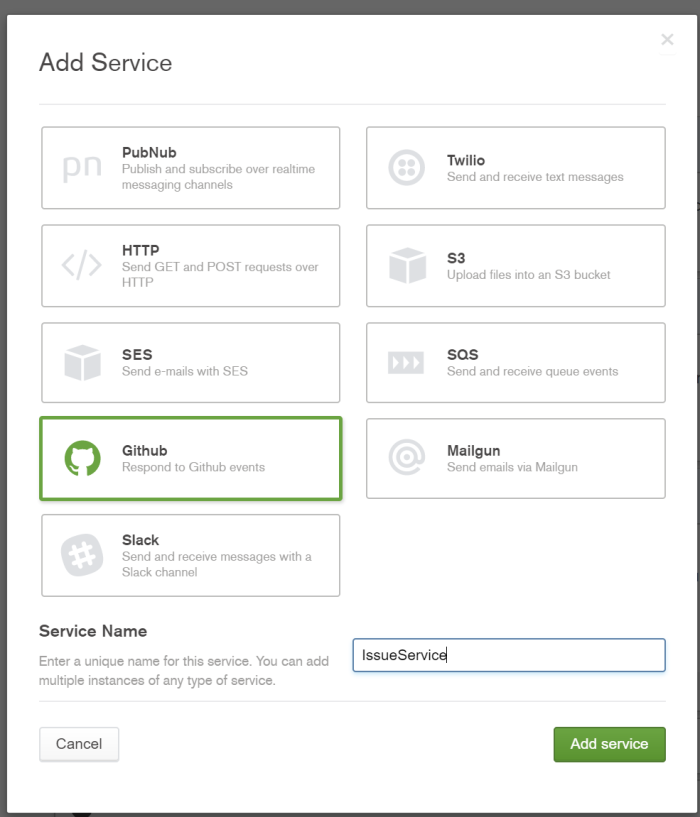
With our User Created and our Database up and running, we need to allow our Stitch application to receive data from GitHub. In the sidebar under Services, click “Add a Service”, choose GitHub and give it a name (I am calling mine IssueService).

8_addService

With our IssueService created, we will add an Incoming Webhook to it. Give the Incoming Webhook a name, and a secret.

Be sure to take note of the secret as we will need it when we configure the GitHub repository to send us information.9_nameAndSecret


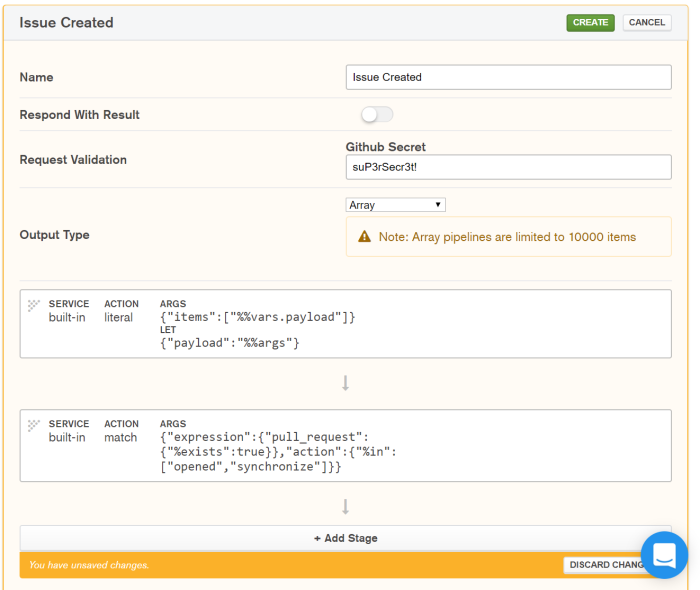
The Webhook Pipeline

Once again, Stitch has set up a nice set of default stages in the pipeline. Pipelines are sequences of actions defined in JSON. Taken from their documentation:

  • Pipelines are written in simple JSON.
  • Pipelines can be constructed in the UI and referenced by name in code, or coded directly with SDKs.
  • Pipelines can use expansions to pass information from one stage to another or incorporate information from outside the pipeline stage
    • Information can be passed from one stage to another with let.
    • Information about requesting user can be incorporated with %%user.
    • Global variables can be defined in Stitch and referenced with %%values.
    • Information about the current or prior state of a document or field can be incorporated through MongoDB expansions.
    • Some services like Twilio can execute a pipeline as a response to an incoming webhook.

The default pipeline for the GitHub incoming webhook has two stages: a literal stage, which binds data coming in from the webhook’s body, and a match stage, which takes the data passed to it from the literal stage and filters it based on an expression. This match stage checks to see if the property “pull request” exists in the document and if the value stored in the property “action” is “opened” or “synchronize”.

For example, this document would pass the match expression:


{
"pull_request" : {
},
"action": "opened"
}

view raw

validPR.json

hosted with ❤ by GitHub

But this one would not:


{
"pull_request":{
},
"action":"closed"
}

view raw

invalidPR.json

hosted with ❤ by GitHub

While this is great for pull requests, we are interested in tracking issues, so let’s edit the default mapping action to the following:


{
"expression": {
"issue": {
"%exists": true
}
},
"action": {
"%in": [
"opened"
]
}
}

This states that we only want to match documents who have a property called “issue” and whose “action” property is “opened”. If we allow “synchronize” events, we may wind up with duplicate data in our database.

With that, our pipeline is ready to receive valid GitHub issue open webhook events, but aside from filtering the data, our pipeline isn’t doing much with it. Let’s look at the Issue Event payload from GitHub. There is a lot of data in there, and while we have the 25 GB Free tier of hosting, it is wasteful to store all that extra data we won’t be using.

Projecting the Data

To filter down some of the unused data, let’s add a new stage to our pipeline, and change its action to “project“. We’ll use this projection action to include only the fields in our document we want. In particular, we will include:

  • issue.html_url
  • issue.id
  • issue.title
  • issue.comments
  • issue.created_at
  • repository.name
  • repository.html_url

This will cut down our data usage significantly.

We do so by defining the following in the event:


{
"projection": {
"issue.html_url": 1,
"issue.id": 1,
"issue.title": 1,
"issue.comments": 1,
"issue.created_at": 1,
"repository.name": 1,
"repository.html_url": 1,
}
}

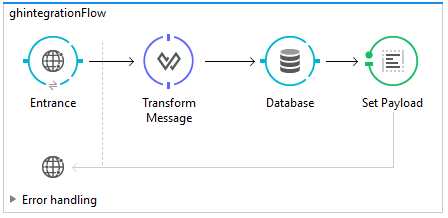
At this point our pipeline should look like this:

10_pipelineStages

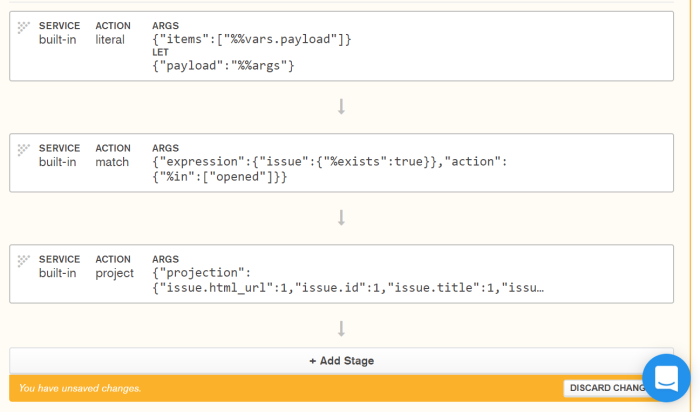
We accept the documents, filter them, and then we map the unnecessary fields away. There are two last steps we need to complete:

  • Give our documents an Owner
  • Insert the documents into our database

Give the Data an Owner

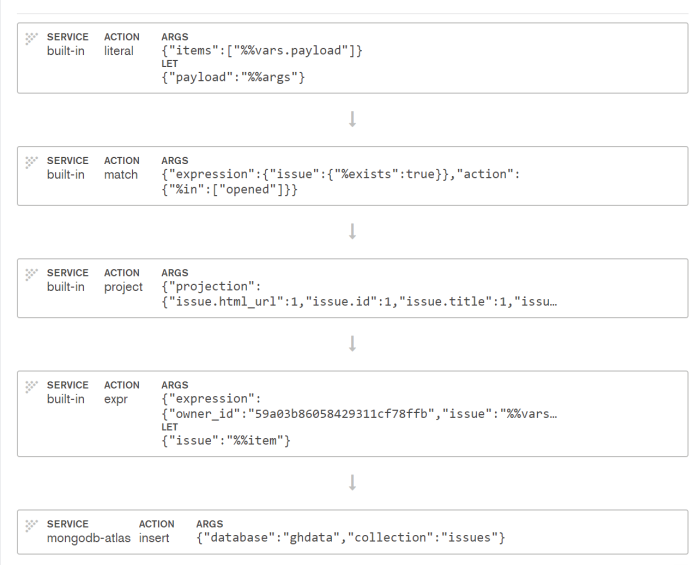
Adding an owner_id field to our data requires a new stage in our pipeline. Let’s create a new stage whose action is “expr” or expression. Expression stages allow documents to be filtered and then modified before being passed on to the next stage. We’ll first need to enable the “Bind to %%vars” toggle in our stage and insert


{
"issue": "%%item"
}

as the content. Next, we will set the main body of the expression to be


{
"expression": {
"owner_id": "<API USER ID HERE>",
"issue": "%%vars.issue"
}
}

where <API USER ID HERE> is replaced by the value of the ID field for the Api User we created earlier.4_noteUserID This returns a whole new document with two top level fields owner_id and issue, with the value of the issue field set to the output of our projection.

Insert the Data into the Database

The final stage we need to add is the easiest! Hit “Add Stage” one more time and

  • Change the “Service” drop down from built-in to mongodb-atlas
  • Change the Action from find to insert
  • Modify the Database value to  ghdata
  • Modify the Collection value to issues

In the end it should look like this:

11_insert

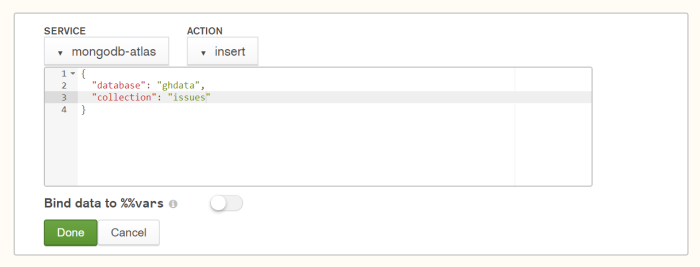
This will connect to our Atlas service and insert the document into the issues collection of the ghdata database.

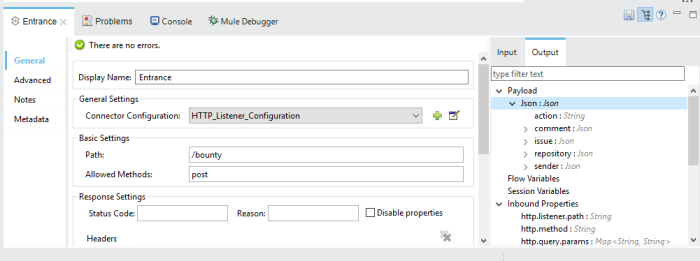
And we are done! Hit create and your pipeline should look like this and be ready to accept incoming webhooks:

12_resultPipeline


Configuring GitHub

Before we jump over to GitHub, you should notice that creating your incoming webhook provided you a webhook url:

13_webhookUrl

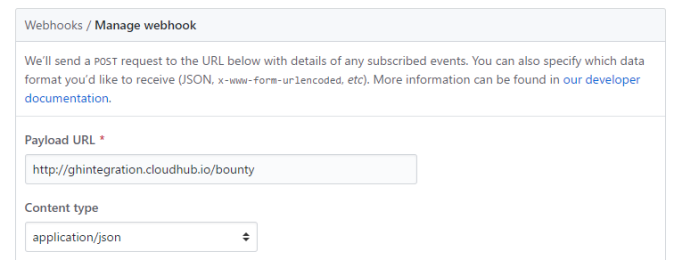
Copy it to your clipboard, and head over to a GitHub repository you want to enable this webhook with. Click on Settings, then Webhooks and the “Add webhook” button.

14_addWebhook

Paste your webhook url into the Payload Url field, change the Content Type drop down to application/json, and set your secret to the secret you configured in your Stitch Application.

15_configureHook

Next, choose “Let me select individual events”, uncheck the “Pull Request” option, and check the “Issues” option.

16_onlyIssues

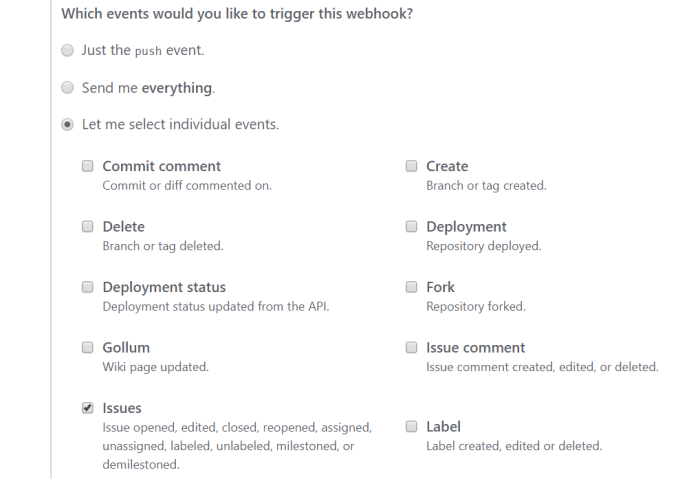
Finally, hit “Add Webhook” to enable it!

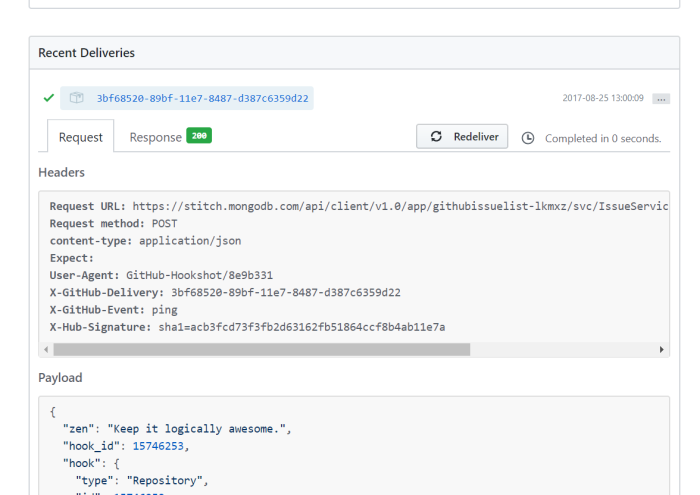
If you click on the webhook and scroll to the bottom of the page, you can see a “Recent Deliveries” section. You can click on each of those identifiers to see if our pipeline returned an error code and what the request looked like.

17_recentPayloads

Making a new Issue

At this point we have our Stitch Application up and running, ready to receive data, and our GitHub repository is ready to push it on new events! Let’s open a new GitHub issue on our repository to see what happens18_firstIssue

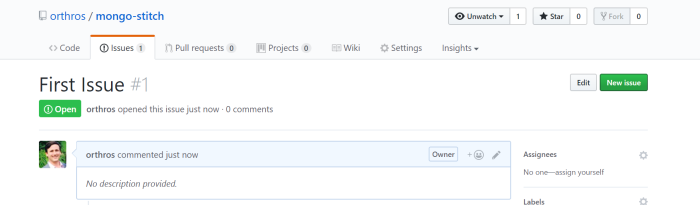
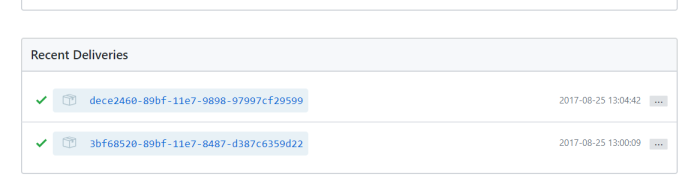
The recent deliveries shows a success

19_issueDelivered

And the Logs console in our Stitch Application show success as well!

20_stitchDataLogs

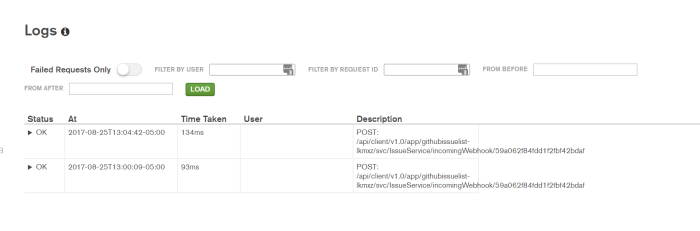
Right now if you were to connect to your Atlas cluster use the ghdata db and run db.issues.find().pretty() you would see something like:

21_prettyDataGotIn

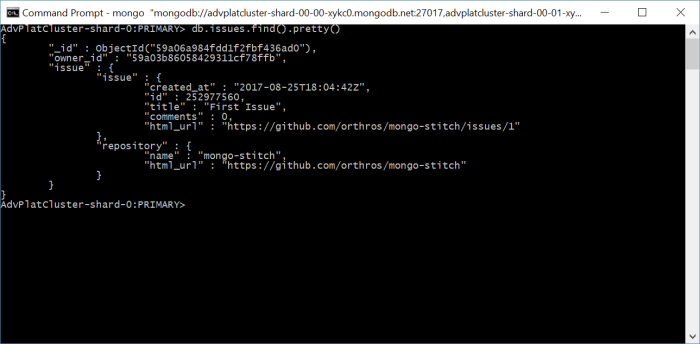
Our data made it all the way through!

Writing the Web Page

The lion’s share of our journey is over. All we need is to write a web page to connect to the Stitch Service and view the data. You can use any framework you like as there are Stitch clients for Node, Javascript, Java, and Swift, but I’m going to write a simple static HTML page suitable for a custom “New Tab” page in your browser. If you want to skip to the end, you can check out the final code in my GitHub repository.

Our page will have a simple title and a div placeholder where we will insert the list of issues we get back from our Stitch Application.

Outline


<html>
<head>
<link rel="stylesheet" href="../static/css/bootstrap.min.css">
<script src="../static/scripts/stitch.min.js"></script>
<script src="../static/scripts/config.js"></script>
<script>
displayIssuesOnLoad() {
//Connect to stitch then display issues
}
displayIssues(){
//Updatethe issues div
}
</script>
</head>
<body onLoad="displayIssuesOnLoad()">
<div class="container">
<br/>
<h3 class="text-center">Current GitHub Issues</h3>
<div class="container-fluid" id="issues">
</div>
</div>
</body>
</html>

I’ve downloaded the Bootstrap css files as well as the Stitch driver so I won’t need online access to them (since this will be a “New Tab” page). I’m also including a config.js file in which I’ll define some constant variables to use.

The config.js is there to expose a number of const variables to use when logging in.


const APP_ID = "githubissuelist-lkmxz";
const APP_DB = 'ghdata';
const APP_COLLECTION = 'issues';
const APP_API_KEY = '<YOUR API KEY HERE>';

view raw

stitchConfig.js

hosted with ❤ by GitHub

The APP_DB and APP_COLLECTION variables come from the database and collection we are storing our issues in.

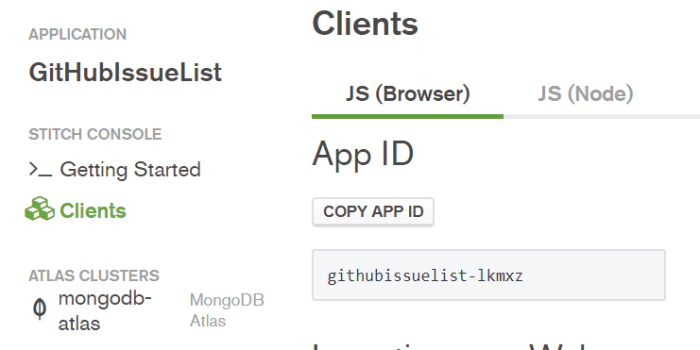
APP_ID is the unique identifier of your Stitch App. You can find it on the Stitch console in the “Clients” sidebar.

23_appID

APP_API_KEY is the API Key the client will use to authenticate with the Stitch Service. You can get the key by going to the Authorization page, editing the API Keys authorization provider, and hitting “Show Key” on the API Key you wish to use.

22_authProvider

Finally, we can write the Javascript client code:


const client = new stitch.StitchClient(APP_ID);
const db = client.service('mongodb', 'mongodb-atlas')
.db(APP_DB);
function displayIssuesOnLoad() {
client.authenticate('apiKey', APP_API_KEY)
.then(displayIssues);
}
function displayIssues() {
db.collection(APP_COLLECTION)
.find({ }, { limit: 10 })
.then(docs => {
console.log(docs);
var html = docs.map(c => `<div class="center-block">
<hr>
<div class="center-block text-center">Issue: <a href="${c.issue.issue.html_url}">${c.issue.issue.title}</a></div>
<div class="text-center">Comments: ${c.issue.issue.comments}</div>
<div class="text-center">
Repository:
<a href="${c.issue.repository.html_url}">${c.issue.repository.name}</a>
</div>
<hr>
</div>`)
.join("");
document.getElementById("issues").innerHTML = html;
});
}

In these two functions we do the following:

  1. New up a StitchClient connected to our Stitch Application
  2. Request a connection to a MongoDB Atlas service and get the database
  3. Authenticate using our API Key
  4. Query the issues collection for all documents (but limiting it to 10)
  5. Log the documents (because debugging is fun!)
  6. Write some html for each document we received
  7. Set the inner content of the div named “issues” to our generated html

This should give us:
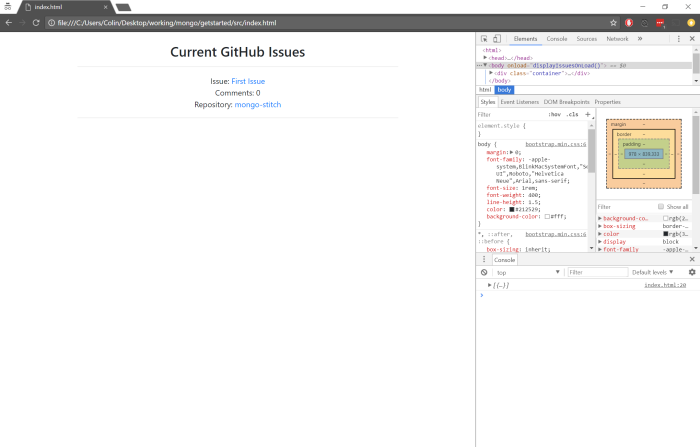
23_theResult

We did it!

So What Have We Accomplished?

We’ve managed to accomplish a lot, if you’ve been following along:

  1. Set up a new MongoDB Database hosted in the cloud via Atlas
  2. Created a Stitch Application
  3. Secured the Application via API Keys, database rules, and filters
  4. Set the Application to respond to incoming webhook events by updating a database
  5. Configured a GitHub repository to provide events when an issue is created
  6. Wrote a Web page to connect to our Stitch Application and display the data in it.

Where Do We Go from Here?

  • Spruce up the Web Page UI
  • Write the Web Page in a full framework like MVC, Spring,or Angular
  • Write Another WebHook for Issues being deleted to remove them from the database
  • Write a mobile App to view the Issues using the Java or Swift Clients
  • Connect the GitHub Pipeline you made to another Pipeline (like Twilio or Slack)
  • Build your own App!

Stitch is a powerful and flexible back-end-as-a-service. As it grows out of beta and connects to more services and pipelines, I can’t wait to see what we can build!

Happy coding!

Mulesoft “Bug Bounty”

Good afternoon and welcome! Today I wanted to share some of my recent experiences with Mulesoft and how you can use it as a cloud information bus between disparate applications.

For those who don’t know, Mulesoft is a cloud or on-prem platform that not only helps manage APIs, but also helps integrate API systems.

Consider the following: your marketing team has come together and for your annual conference, they want a “bug bounty.” During this bug bounty, Issues can be annotated with the “bounty” tag, and if a collaborator grants the bounty to a user, then that user will get a “point” on a leaderboard.

With that in mind, we need to create:

  1. A GitHub repository with a webhook for Issue Comments
  2. A Mulesoft application that receives the webhook, massages the data, and updates the database
  3. A SQL Server in Azure holding the users and their bounties
  4. A .NET MVC site hosted in Azure to view the database.

Let’s get started!

Before we get any further, we need to check the payload GitHub sends when an Issue is commented on. Fortunately, they have a great documentation on their webhooks API, where you can find their “issue-comment” event documentation.

The full payload is a bit long for this post, so I recommend jumping over to their docs at your leisure. The important point is, we can take the body of the comment, assume it is a GitHub username, and update our leaderboard appropriately.

Remember, this is just for proof of concept. In production, we would need to:

  1. Look for a phrase like “Bounty Granted to: {UserName}”
  2. Ensure the commenter is a collaborator to the repository, or possibly an approved “bounty granter”

Once we understand the payload GitHub will be sending us, we need to turn to the front end and database.

MVC and SQL

Let’s use a SQL server backend with code-first EntityFramework and define our model like so:

public class BountyfulUser
{
public int Id { get; set; }
public string UserName { get; set; }
public int BountiesCompleted { get; set; }
}

Next we’ll create a standard MVC application with a new controller: DashboardController. This will, have one function (Index) which selects the top 10 users in the database ordered by number of completed bounties:

public class DashboardController : Controller
{
UserBounty db = new UserBounty();
// GET: Dashboard
public ActionResult Index()
{
var topUsers = db.Users
.OrderByDescending(x => x.BountiesCompleted)
.Take(10);
return View("Index", topUsers);
}
}

Finally, we’ll make a View that displays a set of BountyfulUsers in a table:

@model IEnumerable<BountyCount.BountyfulUser>
@{
ViewBag.Title = "Dashboard";
}
<h2>Top Bounty Hunters!</h2>
<table class="table">
<tr>
<th>
@Html.DisplayNameFor(model => model.UserName)
</th>
<th>
@Html.DisplayNameFor(model => model.BountiesCompleted)
</th>
<th></th>
</tr>
@foreach (var item in Model) {
<tr>
<td>
@Html.DisplayFor(modelItem => item.UserName)
</td>
<td>
@Html.DisplayFor(modelItem => item.BountiesCompleted)
</td>
</tr>
}
</table>

With all that in place, we can deploy our application and database to Azure. Remember, we need to ensure that in our WebApp we have set our connection strings to point to our production Azure SQL server.

connectionString

Now that we have the UI and Database up and running, we need to design our Mule Application to act as a bridge between GitHub and our SQL Server.

The Mule Application

To do this, we need to open up Mulesoft’s IDE, Anypoint Studio, and begin a new project.

The elements we will be using for this are:

  1. Http Endpoint
  2. Transform Message
  3. Database
  4. Set Payload

As you can surmise from the elements used, we are going to receive a payload via the HTTP Endpoint, transform the payload to a more user-friendly data type, update our SQL Database, and set the return value to our user.

At the end, our Message Flow should look like this:

flow

Let’s create a HTTP Listener that listens on all incoming connections, allows POST verbs, and listens on the “/bounty” path. We’ll also use the Metadata tab to set Output Payload to the JSON we found in the GitHub API documentation earlier.

listener

Next, we’ll use the standard Transform Message element to pull out the comment’s body, and pass it to the Database Element.

This is the trickiest part in our application. We’ll need to download the Microsoft SQL Driver jar file from here, and add it as an external library in our Anypoint Studio Mule project. Then we need to create a generic database connection, whose action is to execute the following DDL:

begin tran
if exists (select * from dbo.BountyfulUsers with (updlock,serializable) where dbo.BountyfulUsers.UserName = '#[payload.userId]')
begin
update dbo.BountyfulUsers set BountiesCompleted += 1
where dbo.BountyfulUsers.UserName = '#[payload.userId]'
end
else
begin
insert into dbo.BountyfulUsers (UserName, BountiesCompleted)
values ('#[payload.userId]', 1)
end
commit tran

This checks the database for an existing user and increments their BountiesCompleted if they exist, otherwise it creates a new user and sets their BountiesCompleted to 1.

Lastly we’ll set our return payload to success in our Set Payload element.

And with that, we are done with our Mulesoft application! Now we can publish our application to their cloud platform

deploy

Tying It All Together

Grab the URL of the cloud application and add it as a consumer of our GitHub repository webhooks

webhook

With all that done, we can create a comment on an Issue with a user’s name in it, and watch our dashboard update!

theresult

Congratulations!

You can find the Mulesoft XML in it’s entirety (with passwords omitted) here.

Try it for yourself! Grab my code and try adding the extra validation and security I mentioned earlier. Mulesoft makes it easy to configure branching flows and data validation via Anypoint Studio.

Happy coding!

My Introduction to Flutter

I sat down last weekend and spent some time with Flutter. Though I only wrote one small sample app in it, and I’m not a mobile developer by trade, I wanted to write down a few of my thoughts on it.

The Good

Flutter is Written in Dart

I’ve become a big fan of Dart over the past few weeks. It lives in a space that is approachable from both a C# and a JavaScript perspective, has an approachable package management system, supports functions as first-class objects,  and approaches “strong typing” via dynamic objects with type annotations.

Flutter Compiles to Native

The title says it all. Apps written in Flutter compile to native code on iOS and Android.

Flutter Supports Hot Reloading

This is something that you can see in demos and videos, but it has to be experienced to be fully appreciated. It cuts down on development cycles significantly, and is just plain satisfying to hit the “r” button and watch your changes spring to life without bringing the application down and up again.

The Bad

Flutter is in Alpha

Depending on how adverse you are to deploying alpha software to production, this could be a good or a bad thing. The bright side to Flutter being in alpha means it can only get better!

Some of the More Useful Examples are Buried

I know that this is less about the framework and more about the support system, and that opinion on this may vary from person to person, but the Getting Started tutorials for Flutter, despite being very good at explaining the framework and how to get up and running, do not, in my opinion, dive into the proper way of building multi-screen apps early enough.

Consider the sidebar:

navigationBar

The section that covers making multi-screen apps, and introduces some of the core concepts is not until “Routing and Navigation”, and the previous examples, while good and useful (Building Beautiful UIs with Flutter was particularly helpful), give examples with no Navigation. I highly recommend developers new to Flutter go through the “Get Started”  and “Build UIs” section, but before they sit down and write any code, they check the excellent examples on the Flutter GitHub Page.

A Final Important Thought

This is what I wanted to really talk about:

There is no Template Engine Or WSYWIG Editor

When I first started developing with Flutter I was somewhat surprised to learn that they do not have WSYWIG editor like other UI frameworks (XCode and iOS,  Micoroft Blend and WPF, Android Studio and Android). If you jump in the Flutter Gitter, the maintainers have mentioned that they don’t have any public plans to release one:

noPlans

And you know what? I’m okay with that.

Earlier, I mentioned there is a magic to hot reloading your app, and this is why I don’t feel like Flutter strictly needs a WSYWIG designer. With Flutter, the app is the designer. You don’t like the style of a particular word box? Go find the Widget that contains it, edit the style property, hot reload the app and marvel at your design acumen!

The biggest downside I see is it raises a barrier to entry for people who don’t know how to code and want to design an app’s user experience.

Is there a space for a WSYWIG designer? Of course!

Is Flutter a great framework without one? Definitely!

Will I be using it for my future mobile endeavors? You bet!

Happy Coding!

Flutter on Windows without Android Studio

tldr; Install Gradle

Lately I’ve been falling more in love with Dart and Go, two modern open-source languages by Google, and with the recent murmuring around the Magenta kernel and Fuchsia OS,  I’ve been spending more and more time working in both languages (even writing an Epub reader in Dart).

While I’ve been enjoying writing console apps and libraries, I wanted to try my hand at writing some U.I. apps.

Enter Flutter.

Flutter “is a new mobile app SDK to help developers and designers build modern mobile apps for iOS and Android.” and it feels like a lighter-weight competitor to Xamarin. It has a great getting started guide, so I began with the setup.

Note: I’m running Windows 10 Creator’s edition with Hyper V disabled and Xamarin Installed. Your mileage may vary

After git clone -ing the repo and adding the flutter/bin folder to my PATH, I ran the flutter doctor command and got the following:1_flutterDoctorNoSdk

Flutter couldn’t discover my Android SDK (which I had installed via Xamarin previously), which was no problem: I simply set my ANDROID_HOME environment variable and it picked it up.3_sdkInstalled

Android Studio not being installed was problematic for two reasons:

  1. I was on a bad coffee shop WiFi and probably couldn’t download the entire 1.5 GB installer in a reasonable amount of time.
  2. I am a big fan of the Dart community, in particular Danny Tuppeny’s (@dantup)  Dart Code Visual Studio Code extension which makes developing Dart libraries a breeze, so I’d rather use VSCode and his extension over Android Studio.

With those considerations in mind, I decided to skip installing Android Studio and just run

flutter create myapp

4_flutterCreateWorksNoAndroidStudio

Which made a perfectly good Flutter application I can open and work in with Visual Studio Code.5_aWellCreatedFlutterApp

So let’s flutter run !6_cannnotLocateGradeInstallAS

Unable to locate gradle. Please install Android Studio

So that’s what Flutter needed from Android Studio! At this point my download of Android Studio was 50% complete with another hour to go, so I decided to download and install Gradle manually, update my PATH environment variable and give flutter run another try:8_gradleWorksButBadVM

I’m getting an entirely different error now:

Could not reserve enough space for 1572864KB object heap

A quick Google of this instructed me to update my gradle.properties file with

org.gradle.jvmargs=-XX\:MaxHeapSize\=256m -Xmx256m

Now flutter run took me further, informing me that I had not accepted the license agreement for Android SDK Build-Tools 25.0.3. Which was actually somewhat misleading. In fact I had not even installed the 25.0.3 Build-Tools.

A quick trip to the SDK Manager to install and accept licence for the 25.0.3 Build-Tools, and one last flutter run got me to a successfully running Flutter app, all before Android Studio finished downloading.17_runningProperly

18_runningInEmulator

Success!

From here you can iterate and improve on their sample apps or get started with your own!

Happy coding!

Where Should Documentation Go? Or “Is DateTime Broken?”

“Where should my documentation go?” may seem like an odd question to ask, but where you put your documentation defines how it is consumed and where you train your Developers and Users to look for it when troubleshooting problems.

In the VisualStudio & .NET world, I find more often than not, our team goes to Intellisense first for documentation (and I suspect that is the most common practice in other teams as well).

We’ll put summary tags explaining parameters, expected behavior, etc. over commonly used key functions for the convenience of new developers and maintainers, and later generate XML documentation from the tags for storage and distribution.

Here’s an example of one of the more detailed summary tags we have for our extension method, DistinctBy:

/// <summary>
/// Returns distinct elements from a sequence using the provided function to compare values.
/// </summary>
/// <typeparam name="TSource">The type of the elements of source.</typeparam>
/// <typeparam name="TKey">The type of the key used to compare elements.</typeparam>
/// <param name="source">The sequence to remove duplicate elements from.</param>
/// <param name="keySelector">A function to select the key for determining equality between elements.</param>
/// <returns>An IEnumerable&lt;T&gt; that contains distinct elements from
/// the source sequence.</returns>
public static IEnumerable<TSource> DistinctBy<TSource, TKey>(this IEnumerable<TSource> source, Func<TSource, TKey> keySelector)

Now that we’ve established where our team (and I suspect other developers) go first for documentation, I’d like to present a small program I wrote that caused the team a lot of grief two weeks ago:

static void Main(string[] args)
{
    var now = DateTime.MinValue;
    var nowPlusASecond = now.AddSeconds(1);
    var nowPlusOneSecondAndABit = now.AddSeconds(1.0001);
          
    if (nowPlusASecond.Ticks == nowPlusOneSecondAndABit.Ticks)
    {
        Console.WriteLine("Do you think we will get here?");
        Console.WriteLine("Apparently these DateTimes refer to the same instant");
    }
    Console.WriteLine("Press 'Enter' to exit");
    Console.ReadLine();
}

The output of this program surprised us:

Do you think we will get here?
Apparently these DateTimes refer to the same instant
Press 'Enter' to exit

Wait… what?

Those two times should be different. Granted, they wont be different by much, but they should be demonstrably different on a Ticks level (since a Tick represents one ten millionth of a second). For applications that assume time resolution on a Tick level, this is a big deal.

Confronted with this problem, we visited the Intellisense for AddSeconds and found the following:
dtAddSecIntell

This seems fairly reasonable and our team was scratching our heads trying to determine if we had discovered some bug in .NET (spoiler… we hadn’t), or if there was just some key piece of information we were missing from the documentation. At this point, we turned to our second-tier source for documentation: the MSDN. The MSDN’s reference on AddSeconds, and found the following (emphasis mine):

Remarks
This method does not change the value of this DateTime. Instead, it returns a new DateTime whose value is the result of this operation.
The fractional part of value is the fractional part of a second. For example, 4.5 is equivalent to 4 seconds, 500 milliseconds, and 0 ticks.
The value parameter is rounded to the nearest millisecond.

This is a key piece of information that would be, in my opinion, good information to have in the Intellisense. By having the type of the parameter be double it implies to the developer full double precision, when in fact, it is rounding to three decimal places.


The Takeaway
If you think your API violates the Principle of Least Astonishment, not only should you document it, but you should ensure it is documented in the place your Developers are most likely to look first in addition to your primary source of documentation.

Counter-intuitive LINQ

When someone asks me to describe LINQ, depending on their familiarity I might say something along the lines of:

It’s magic!

or

A way of writing SQL-like statements in C#

or most specifically

A set of tools using extension methods and generics to perform queries on sets of data

At the end of the day, however, I do caution them that LINQ is easy to learn, hard to master.

When I first started using LINQ my mentor said “At the end of your query, just send it .ToList(). You’ll thank me later.”

He and I had a few more discussions on why you should be sending your LINQ queries .ToList() and he didn’t know himself other than “Performance and Delayed Execution.”

When working with other C# developers, I find that the Delayed Execution feature of LINQ is the concept they struggle with most. They remember it, work with it, but inevitably write code that forgets that feature, and ultimately create bugs.

Consider the following classes:

Master:

class Master
{
    public Guid MasterID { get; set; }
    public string SomeString { get; set; }
    public Master()
    {
        MasterID = Guid.NewGuid();
        SomeString = "Some Master";
    }
}

And Detail:

class Detail
{
    public Guid MasterFK { get; set; }
    public string SomeDetails { get; set; }
    public Detail(Guid masterFK, string someDetails)
    {
        MasterFK = masterFK;
        SomeDetails = someDetails;
    }
}

Using those two classes, read the following lines of code and think about what the output will be.

static void Main(string[] args)
{
    var mast = new Master();
    var deta = new Detail(mast.MasterID, "");
    var masters = new List<Master>() { mast };
    var details = new List<Detail>() { deta };

    int iterations = 0;
    var joinedValues = masters.Join(details,
                                    x => x.MasterID,
                                    x => x.MasterID,
                                    (x, y) =>
                                    {
                                      iterations++;
                                      return new { Mas = x, Det = y };
                                    });

    Console.WriteLine("The number of times we returned a value is: " + iterations);
    Console.WriteLine("The number of values is: " + joinedValues.Count());
    Console.ReadLine();
}

Got it? Okay, here’s the output:


The number of times we returned a value is: 0
The number of values is: 1

To some of coworkers, when they saw this result, they immediately wanted me to open up GitHub and submit a bug report to the .NET team. They thought they found a critical bug in the LINQ library.

The thing to realize is that in this code we have only created the query when we print out “iterations”, we haven’t executed the query yet, so the value of iterations is still 0. Adding the following line will get results closer to what you expect:

Console.WriteLine("The number of times we returned a value is: " + iterations);
Console.WriteLine("The number of values is: " + joinedValues.Count());
Console.WriteLine("The number of times we returned a value now is: " + iterations);
Console.ReadLine();

Output:

The number of times we returned a value is: 0
The number of values is 1
The number of times we returned a value now is: 1

Since we executed the query when we called joinedValues.Count(), we incremented the iterations variable in our return value, giving the result we initially expected.

A final word of warning on this, however: consider the following code modification. What do you think will be the output?

Console.WriteLine("The number of times we returned a value is: " + iterations);
while (true)
{
    Console.WriteLine("The number of values is " + joinedValues.Count());
    Console.WriteLine("The number of times we returned a value now is: " + iterations);
    Thread.Sleep(1000);
}
Console.ReadLine();

You can probably see where this is going:

The number of times we returned a value is: 0
The number of values is 1
The number of times we returned a value now is: 1
The number of values is 1
The number of times we returned a value now is: 2
The number of values is 1
The number of times we returned a value now is: 3
...

And so on and so on

Every time we are calling .Count() on our IEnumerable (joinedValues) we are re-evaluating the query. Think about what that might mean if you wrote expensive code in your join like so:

var joinedValues = masters.Join(details,
                                x => x.MasterID,
                                x => x.MasterID,
                                (x, y) =>
                                {
                                  iterations++;
                                  //Do some expensive work
                                  Thread.Sleep(10000);
                                  return new { Mas = x, Det = y };
                                });

Then every time you did an operation on that query, you are re-doing that expensive work.

So remember: if you want the code in your join to be executed immediately, or you are doing expensive work you don’t want to repeat, it is safest to send your LINQ queries .ToList() or some other persistent data object.

Hello World!

Hello World!

Need I say more?

I probably should…

Welcome to my first blog post. I’m going to keep it short and sweet because if there is one thing I’ve learned from other internet creators, it is that when first getting started creating content, the price you pay agonizing over creating your first set of content, and painstakingly making sure it is “perfect” in every way vastly outweighs the benefit of the practice and discipline of putting out good content regularly.

So at this point, I’d like to borrow an idea from two developers older and wiser than I: Bob Scheifler and Jim Gettys. Scheifler and Gettys were two of the original developers for the X Windows System, and they had the foresight to, at the beginning of their work, set out seven guiding principles for the development of X. Many of their principles can be applied to all software development, but over the years, one has stuck out to me more than the rest:

It is as important to decide what a system is not as to decide what it is. Do not serve all the world’s needs; rather, make the system extensible so that additional needs can be met in an upwardly compatible fashion.

That is a powerful statement. Limit your scope. Limit your features, but give yourself room to grow. With that in mind, I’d like to define both what this blog is, and is not about

This blog is about:

  • Learning
  • Knowledge sharing
  • Software Development
  • Working as a professional Software Developer and Technologist
  • New Technology and Hardware

This blog is not about:

  • Divisiveness
  • Closed mindedness
  • Dogmatic principles (software or otherwise)
  • “Office Drama”

And with that I leave you hopefully as excited as I am to get started on this journey.