Good afternoon and welcome! Today I wanted to share some of my recent experiences with Mulesoft and how you can use it as a cloud information bus between disparate applications.
For those who don’t know, Mulesoft is a cloud or on-prem platform that not only helps manage APIs, but also helps integrate API systems.
Consider the following: your marketing team has come together and for your annual conference, they want a “bug bounty.” During this bug bounty, Issues can be annotated with the “bounty” tag, and if a collaborator grants the bounty to a user, then that user will get a “point” on a leaderboard.
With that in mind, we need to create:
- A GitHub repository with a webhook for Issue Comments
- A Mulesoft application that receives the webhook, massages the data, and updates the database
- A SQL Server in Azure holding the users and their bounties
- A .NET MVC site hosted in Azure to view the database.
Let’s get started!
Before we get any further, we need to check the payload GitHub sends when an Issue is commented on. Fortunately, they have a great documentation on their webhooks API, where you can find their “issue-comment” event documentation.
The full payload is a bit long for this post, so I recommend jumping over to their docs at your leisure. The important point is, we can take the body of the comment, assume it is a GitHub username, and update our leaderboard appropriately.
Remember, this is just for proof of concept. In production, we would need to:
- Look for a phrase like “Bounty Granted to: {UserName}”
- Ensure the commenter is a collaborator to the repository, or possibly an approved “bounty granter”
Once we understand the payload GitHub will be sending us, we need to turn to the front end and database.
MVC and SQL
Let’s use a SQL server backend with code-first EntityFramework and define our model like so:
| public class BountyfulUser | |
| { | |
| public int Id { get; set; } | |
| public string UserName { get; set; } | |
| public int BountiesCompleted { get; set; } | |
| } |
Next we’ll create a standard MVC application with a new controller: DashboardController. This will, have one function (Index) which selects the top 10 users in the database ordered by number of completed bounties:
| public class DashboardController : Controller | |
| { | |
| UserBounty db = new UserBounty(); | |
| // GET: Dashboard | |
| public ActionResult Index() | |
| { | |
| var topUsers = db.Users | |
| .OrderByDescending(x => x.BountiesCompleted) | |
| .Take(10); | |
| return View("Index", topUsers); | |
| } | |
| } |
Finally, we’ll make a View that displays a set of BountyfulUsers in a table:
| @model IEnumerable<BountyCount.BountyfulUser> | |
| @{ | |
| ViewBag.Title = "Dashboard"; | |
| } | |
| <h2>Top Bounty Hunters!</h2> | |
| <table class="table"> | |
| <tr> | |
| <th> | |
| @Html.DisplayNameFor(model => model.UserName) | |
| </th> | |
| <th> | |
| @Html.DisplayNameFor(model => model.BountiesCompleted) | |
| </th> | |
| <th></th> | |
| </tr> | |
| @foreach (var item in Model) { | |
| <tr> | |
| <td> | |
| @Html.DisplayFor(modelItem => item.UserName) | |
| </td> | |
| <td> | |
| @Html.DisplayFor(modelItem => item.BountiesCompleted) | |
| </td> | |
| </tr> | |
| } | |
| </table> |
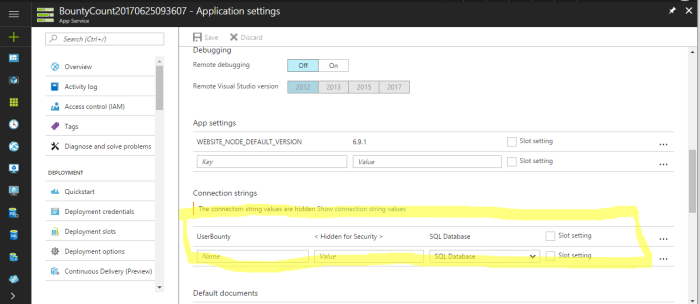
With all that in place, we can deploy our application and database to Azure. Remember, we need to ensure that in our WebApp we have set our connection strings to point to our production Azure SQL server.
Now that we have the UI and Database up and running, we need to design our Mule Application to act as a bridge between GitHub and our SQL Server.
The Mule Application
To do this, we need to open up Mulesoft’s IDE, Anypoint Studio, and begin a new project.
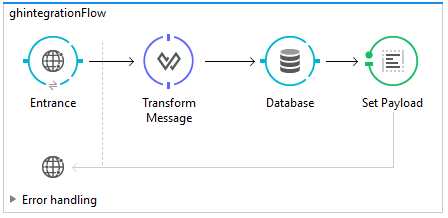
The elements we will be using for this are:
- Http Endpoint
- Transform Message
- Database
- Set Payload
As you can surmise from the elements used, we are going to receive a payload via the HTTP Endpoint, transform the payload to a more user-friendly data type, update our SQL Database, and set the return value to our user.
At the end, our Message Flow should look like this:
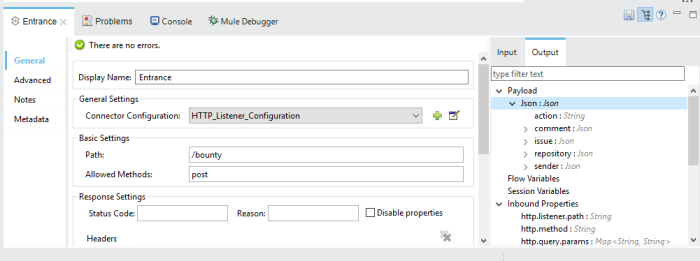
Let’s create a HTTP Listener that listens on all incoming connections, allows POST verbs, and listens on the “/bounty” path. We’ll also use the Metadata tab to set Output Payload to the JSON we found in the GitHub API documentation earlier.
Next, we’ll use the standard Transform Message element to pull out the comment’s body, and pass it to the Database Element.
This is the trickiest part in our application. We’ll need to download the Microsoft SQL Driver jar file from here, and add it as an external library in our Anypoint Studio Mule project. Then we need to create a generic database connection, whose action is to execute the following DDL:
| begin tran | |
| if exists (select * from dbo.BountyfulUsers with (updlock,serializable) where dbo.BountyfulUsers.UserName = '#[payload.userId]') | |
| begin | |
| update dbo.BountyfulUsers set BountiesCompleted += 1 | |
| where dbo.BountyfulUsers.UserName = '#[payload.userId]' | |
| end | |
| else | |
| begin | |
| insert into dbo.BountyfulUsers (UserName, BountiesCompleted) | |
| values ('#[payload.userId]', 1) | |
| end | |
| commit tran |
This checks the database for an existing user and increments their BountiesCompleted if they exist, otherwise it creates a new user and sets their BountiesCompleted to 1.
Lastly we’ll set our return payload to success in our Set Payload element.
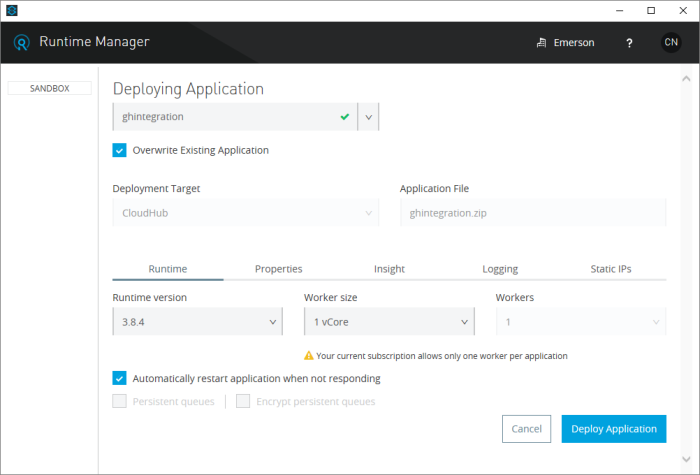
And with that, we are done with our Mulesoft application! Now we can publish our application to their cloud platform
Tying It All Together
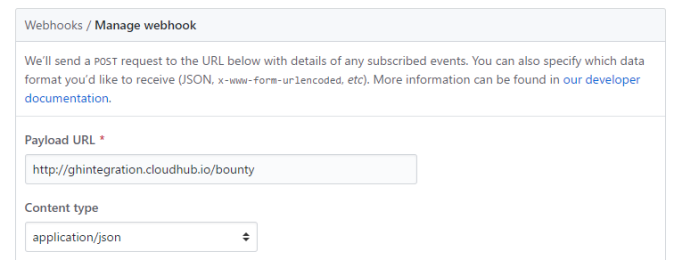
Grab the URL of the cloud application and add it as a consumer of our GitHub repository webhooks
With all that done, we can create a comment on an Issue with a user’s name in it, and watch our dashboard update!

Congratulations!
You can find the Mulesoft XML in it’s entirety (with passwords omitted) here.
Try it for yourself! Grab my code and try adding the extra validation and security I mentioned earlier. Mulesoft makes it easy to configure branching flows and data validation via Anypoint Studio.
Happy coding!